Tag Archives: kill lawn

Drought in the Landscape: What To Do Now

I’m getting lot’s of calls from people asking how to decrease landscape water use.  Here in Butte County, 75% of residential water use goes to landscaping.  ‘Droughtifying’ your landscape is a simple way to exceed Governor Brown’s request to reduce residential water use by 25%.  Get started with the following steps:

Sheet Mulching: Brown is the New Green

Sheet Mulching: Brown is the New Green

  1. Get rid of unneeded or under-used lawn.  Use solarizing or sheet mulching to kill your lawn – see my earlier posts for step by step instructions for these effective, non-toxic methods.  Starting now will set you up for replanting this fall.  Yes, your yard will look funky this summer.
  2. Water remaining lawn (do you really need it?) deeply and less frequently.  Your lawn will actually be better off being watered twice a week rather than daily.  Deep irrigation encourages deep root growth, which results in better drought resistance and reduced fungal diseases.
  3. Also, mow less and set your mower to cut at a minimum 4″ height. Less stimulation of new, thirsty growth and decreased evaporation means lower water use.
  4. Replace spray irrigation with drip irrigation.  Less water use, less loss to evaporation, reduced weeds, water applied right to the root zone; what ‘s not to love?
  5. Water in the wee hours of the morning.  For lawns, water between 2 and 5 am.  For drip irrigated plants, water before 9 am.
  6. Apply a 4″ to 6″ thick layer of wood chip mulch to all planting beds.  See my earlier post for many great reasons to become a mulch fanatic.  Make sure you keep the mulch about 8″ away from plants stems.
  7. Beautiful Foothill Penstemon

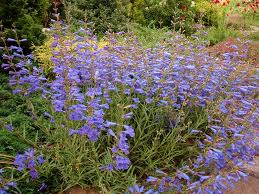
    Beautiful, Drought Tolerant Foothill Penstemon

    Phase out thirsty landscape plants.  Water-loving Chico favorites such a azaleas, rhododendrons, hydrangeas, Japanese Maples, annual flowers, and roses are dangerous beauties.  They are simply not appropriate for our dry summer conditions.

  8. Next fall, after the rains start, replant with drought tolerant native and well-adapted non-native species.  For a sunny garden that uses very little added water, even in our extreme
    arroyo-2

    Deer Grass, Cleveland Sage, CA Fuchsai, and CA Buckwheat make a lovely, dry garden

    heat, turn to CA Buckwheat (Eriogonum fasciculatum), Naked Buckwheat (Eriogonum Nudum), Coffeeberry (Rhamnus californica ‘Eve Case’), Foothill Penstemon (Penstemon h. ‘Margarita BOP’), Deer Grass (Muhlenbergia rigens), CA Fescue (Festuca californica), CA Poppies (Eschscholtzia californica), Moonshine Yarrow (Achillea ‘Moonshine’), Common Yarrow (Achillea millefolium), Blue Gramma Grass (Bouteloua gracilis), Scarlet Mallow (Spheralcea munroana), Rosemary (Rosmarinus spp.), Black or Cleveland Sage (Salvia mellifera or clevelandii), CA Fuchsia (Epilobium californica), Autumn Sage (Salvia gregii), and Russian Sage (Perovskia ‘Little Spire’).

  9. Check out Chico’s own native CA plant grower, Floral Native Nursery, for many other drought tolerant plants.
  10. Limit pruning.  Pruning stimulates new growth which increases a plant’s water needs.

Drought tolerant landscapes are beautiful down deep.  Start creating your own today!

The Front Yard Evolution Begins

A Resource Devouring Lawn

My mission to convert lawns in Chico into native and edible gardens began with a death.  My kind and gentle father agreed to let me murder his front lawn.  This wasn’t a limping, half-dead lawn, either.  He’d been carefully mowing, fertilizing, and watering it into a state of lush greeness for the past nine years.  In fact, that was the only time he ever spent in his front yard.  And, being the supportive guy that he is, he not only approved of the proposed killing but acted as my accomplice.

Solarizing with Clear Plastic

We started Solarizing in late July.  Solarizing is a simple, non-toxic method for killing lawns that UC Davis has researched extensively, ceamador.ucdavis.edu/files/942.pdf.  We thoroughly soaked his lawn with water (I mean, really soaked it, for hours) then rolled 4 mil clear plastic to completely cover it.  We used 1×4 boards and stones that my Dad already had to securely fasten the plastic.  Total time: less than 2 hours.

Six weeks later, we removed the plastic.  Ta da!  Nothing but dead lawn except for a couple of small spots in the shadow of the large maple that grows in the center of the lawn.  I used a hoe to peel these out, roots and all.  We left the remains of the former lawn where they lay so they can compost into humus.

We were ready to start Phase 2: planting.

Here’s a step by step description of our Solarizing process.

The Lawn is Dead

Materials:

1. Widest clear plastic sheeting you can find – least 10′ wide, clear plastic. Wider is better although more cumbersome to use. You can use one to four mil thickness plastic for solarizing. We used 4 mil thickness because we were concerned that wind might tear a thinner plastic.  However, thinner plastic does allow more heat to get to the soil.  Painting stores and hardware stores carry all types. It’s sold in rolls.

2. Fastening materials: Clear plastic packing tape (the strong, wide kind) to hold the plastic sheets together at the seams.

3. Fist sized stones or narrow boards to weigh the plastic down to prevent billowing.

4. Marking spray paint. This is the kind that sprays upside-down.

5. Utility knife to cut the plastic.

6. Two people (three is even better) on ‘plastic day’

Process:

Solarizing is a non-toxic method to kills lawns and annual weeds.  It works best in full sun.  Use solarizing to kill fescue, rye, and bluegrass lawns.  It is less successful for Bermuda grass.

Day One: Preparing your lawn

1. ‘Scalp’ your lawn with mower set at lowest setting.

2. Mark the location of your irrigation heads with the spray paint. Spray the grass around the head, not the head. If your irrigation heads are hard to find, turn them on briefly so you can spot them.

3. Using a trenching machine, cultivator, or a shovel, dig a trench 4″ deep by about a foot wide around the perimeter of the area to be solarized. Bevel the inside edge of the trench so that there is not an abrupt ‘drop’ into the trench.  Pile the dirt along the trench outside of the area that will be solarized. Watch out for your irrigation heads!

4. Water your lawn very thoroughly. This may take a whole day or more if you don’t have automatic sprinklers; you need to soak it deeply with about 12″ depth of water. Put several cans on your lawn to keep track of how much water you are putting down.

Day Two: Plastic Day

5. Put plastic down: Starting at one of the outside edges, roll plastic out one row at a time. Use dirt stockpiled from your trench to anchor the outside edge of plastic. At seams, overlap by 6-12″ and use a several inch long piece of tape every few feet to fasten the top layer to the bottom layer.   To prevent billowing in wind, place boards or stones on the plastic.   Success depends on a snug fit and tight seal!

6. Wait 4-6 weeks. It will take longer if the weather is not consistently hot (above 80 degrees) during the day or if there is shade cast onto the area.

7. Remove plastic. Dump trench soil onto the interior of the dead lawn so that you retain your trench. The trench will help prevent mulch (added later, after solarizing is complete and plants are in) from spilling from your planting beds. If any patches of lawn show signs of life, use a hoe to peel back and remove the sod.  As for the dead lawn; just leave it in place.  Eventually it will compost.